Today, I
will share with you a feature for creating a Ribbon button on a SharePoint
server UI. This button will start a SharePoint 2013 workflow when pressed. As a
matter of fact, you can achieve this by two different features which actually
share many things in common – they are Quick Steps and Custom Actions. I will
go with Quick Steps first which provides a more tailored user experience for
this goal and then explain Custom Actions briefly.
If you are
already used to Custom Actions or Quick Steps to start SharePoint 2010
workflow, then you can just try to create one to start a SharePoint 2013
workflow. Since the UX is, basically, the same, it should be easy for users who
have done this before.
Quick Steps
I will
explain in detail how you can create a Quick Step to start a SharePoint 2013
workflow.
Preparation
Creating a
Quick Step requires some prerequisites.
First, you
need to prepare a Ribbon icon file to show up in the Ribbon for the Quick Step
you will define in the following steps. I decided to use the Site Assets
document library and uploaded an image file there.
Second, you
must have a list or document library you want to create the Quick Step in. In
this example, I will use a Vacation Request list and create a quick step which
starts a workflow to request an approval for the vacation.
Create a Quick Step
Now that you
have the list to use, it is time to create a Quick Step. It is very easy. Just
click the New Quick Step button under Customize List group in LIST
Ribbon tab as highlighted below.
If you used
a document library, you can find it under Customize Library group in the
LIBRARY Ribbon tab as below.
Clicking the
button will lead you to this dialog where you just need to choose Allow.
SPD is then
launched with the Vacation Request list shown with the following dialog popped
up.
Take some
time to explore the UIs on this dialog. You will find that you can create a new
workflow based on SharePoint 2013 Workflow or SharePoint 2010 Workflow, or use
some existing workflows. You will also notice that you can define the button
label and button image. As we will create a new workflow based on SharePoint
2013 Workflow, choose the Start a new workflow option and then choose SharePoint
2013 Workflow as the Platform Type. Type in ‘Vacation Approval’ for
the Button Label field. Lastly, click the Browse button to locate
the icon image we uploaded in the Preparation section. Your dialog should look
like below:
Once you
click OK, a workflow designer for SharePoint 2013 Workflow will be
presented as below. Feel free to complete the workflow logic. In this example,
as mentioned before, we will create a Vacation Approval workflow.
Once you
publish your workflow, you’ve finished creating a new Quick Step. If you go to
the ITEMS Ribbon tab, you will find a new Ribbon group Quick Steps
is created and a new Ribbon menu Vacation Approval is created as well.
And if you
go to the list summary page for the Vacation Request list in SPD, you will find
that a workflow named ‘Button – Vacation Approval’ is present and a Custom
Action named ‘Vacation Approval’ is created. As a matter of fact, Quick Step is
a specific kind of Custom Actions. So if you are familiar with the Custom
Actions’ features, you can apply them to your Quick Steps as well.
Modify Quick Step (Advanced)
As Quick
Step is a mixture of Custom Action (‘View Ribbon’ type Custom Actions) and a
list workflow, you can apply some Custom Action features to modify the created
Quick Step. If you click ‘Vacation Approval’ in the Custom Actions slab, the
following dialog will be presented.
You can
change the name of the button and even update the Quick Step to do a different
job such as navigation to some forms or web pages, or starting a different
workflow.
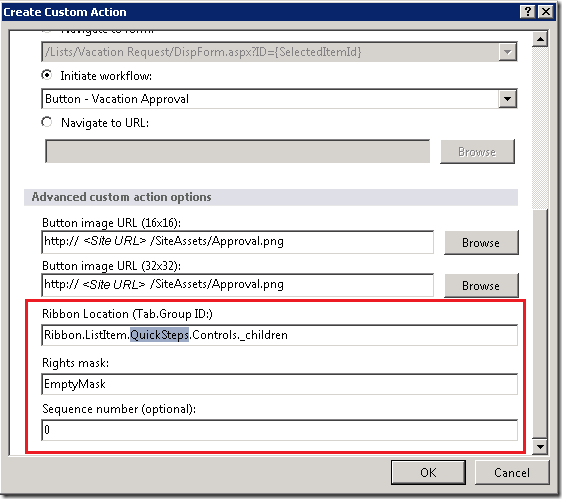
And if you
scroll down a bit, you can find some advanced settings. If you use the Ribbon
Location field and Sequence number field, you can change the
location of the Ribbon button.
Let’s say,
we want the button to show up in Workflows group rather than in Quick
Steps group and want it to show up last in the group. Then you can easily
achieve this by modifying the values to followings:
This will
make the button show on the targeted location as below.
If you want
to know more about the values available in the Ribbon Location, please refer to
following article or search for some other blog articles explaining Custom
Actions.
For Rights
mask, you can use the values from the below site separated by semicolons to
allow only permitted user to see/use the Custom Action.
Custom Actions
Let’s say
now, that after you have a new Ribbon menu to start the Vacation Request
workflow, you want a similar menu on the List Item Menu so that users can start
a workflow by right-clicking over an item, like below:
To do this,
you need to create a new Custom Action of type List Item Menu. You can find the
Custom Action Ribbon button in the list summary page for the Vacation
Request list in SPD. If you click it, you will be presented with the following
options. In this example, please choose List Item Menu.
In the
dialog that follows, please choose Initiate workflow option and select the
‘Button – Vacation Approval’ workflow which was created during the creation of
Quick Step so that two UIs will start the same workflow. And Click OK.
That’s it.
You created the menu. If you go to the Vacation Request list, choose one item,
and see the list item menu, you can find it.