Showing posts with label sharepoint 2013. Show all posts

Monday, April 14, 2014

Perform eDiscovery exercise in SharePoint 2013

In a previous post I discussed what eDiscovery is and what is its place within SharePoint 2013. In this post I will explain how to exercise an eDiscovery task using features provided by SharePoint. Before we begin, let’s break the features in to 4 components.

1. eDiscovery site Templates

If we take a scenario of an organization, which can have multiple litigation related cases, audit exercises, etc.. it can have a site collection created from the template “eDiscovery Center” to manage all. You need to keep in mind that the eDiscovery Center template is available for Enterprise license only. After you create a site collection based on eDiscovery Center template, you can centrally manage all your eDiscovery related cases.


To create individual cases, We have another template called “eDiscovery Case”. If we create a case using this template it will be created as a sub web.


Each case is equipped with sections called eDiscovery sets,Queries, Exports. Furthermore record managers and others in legal team (site users) can use normal collaboration features from document libraries, calendars, task lists etc..


2. In-Place hold (In-Place preservation)

As we discussed in earlier post in-place hold is a mechanism to preserve content for litigation. Using eDiscovery features in SharePoint 2013 we can preserve content in SharePoint itself, Exchange mailboxes and Lync content. Hold can be placed either at the site or mailbox level, or can use query-based preservation.
Once you create a eDiscovery case, you can create eDiscovery sets to discover (find) and hold specific content. To preserve content, first we need to click on new item in eDiscovery sets.


It allows us to add multiple sources (SharePoint 2013 sites or Exchange mail boxes) 


After selecting the source, we can click on Enable In-Place Hold radio  button to preserve the content.

Lets assume you have thousands or millions of records in the site collection, It’ll be very difficult and expensive to process all of those content by the legal team. Gartner mentioned that, discovering right content accounts 35% of total litigation costs in USA. It sums up to billions. So to make our lives easier we can filter contents using queries.

We can filter content in 2 ways.

a) Apply filter from eDiscovery set

We can do that while we create the eDiscovery set or by editing an existing eDiscovery set. Let’s assume I have a large set of documents, and I need only content within a specific time frame and content that relate to “Research”. So I would apply a filter as below


b) Add queries to the content from Query and Export section

Lets assume that I' have multiple data sources, so I create multiple eDiscovery sets to easily manage the eDiscovery process. Then I figure out the content is still too large for the litigation process.  eDiscovery query section comes very handy at that point as I can apply filters to a specific eDiscovery set, all or multople discovery sets.


3. eDiscovery Export

Once we discover the content by above means we need to download the content so we can produce them to legal team for review. To do that there is an export tool.

To export the content we need to go to search and export section and click on export button


We can either download content or download the content.


The export tool download documents and lists items as well. Furthermore it generates a manifest file with metadata which complies Electronic Discovery Reference Model (EDRM). This itself is a very important feature. Let’s assume the litigation team has a 3rd party tool which they use to proof read the discovered content and it can input EDRM compliant content. Then we can directly input the exported package to that system. So as you can see there can be various interactions with other systems.

4. eDiscovery API

We can use the eDiscovery API to extend default features using components of Microsoft,Office.Server.Discovery namespace.

Above is a brief introduction on how to use eDiscovery features in SharePoint. You can find further info by referring following resources

Friday, April 11, 2014

SharePoint 2013 Out of Box Web Parts

Here is the list of SharePoint out of box web parts

http://wonderlaura.com/Lists/Posts/Post.aspx?ID=214

Thursday, March 20, 2014

SharePoint 2013 list column status wise Change row Color using jQuery


Introduction:
 
In this article we have been given is to put together a Requester monitoring list which is easy enough to do in SharePoint, but the 3 status easy visual way of seeing what status each of the requester was on.

The status used in this list is:
Approved
Rejected
Pending
These values are populated from a Choice field in the list, But as you can see from the before image below it is not that easy to quickly and easily see what level each of the Requester is on.


On the Edit page, select the Insert Web Part tab from the Ribbon. From the Categories menu, select Media and Content and then Script Editor from the Parts menu: 


Click on the Add button at the bottom of the page to install the Web Part. 
Embedding Code to Your Site:

Once the Web Part has been successfully installed on your page, you will see a hyperlink button under the Script Editor labelled EDIT SNIPPET. Click the EDIT SNIPPET link to insert HTML/Script code:

<script type="text/javascript" src="//ajax.googleapis.com/ajax/libs/jquery/1.10.0/jquery.min.js"></script>
<script type="text/javascript">
$(document).ready(function(){$Text = $("td.ms-cellstyle.ms-vb2:contains('Approved')");$Text.parent().css("background-color", "#01DF3A");
$Text = $("td.ms-cellstyle.ms-vb2:contains('Rejected')");
$Text.parent().css("background-color", "#F90101");
$Text = $("td.ms-cellstyle.ms-vb2:contains('Pending')");
$Text.parent().css("background-color", "#EAC117");
});
</script>


After you have inputted the appropriate code in the Embed dialog box, click Insert to save the HTML/Script. 
Below you can see the end result with some data entered and different names against different action Status


Monday, February 17, 2014

How to create a Quick Step and Custom Action to start SharePoint 2013 workflow


Today, I will share with you a feature for creating a Ribbon button on a SharePoint server UI. This button will start a SharePoint 2013 workflow when pressed. As a matter of fact, you can achieve this by two different features which actually share many things in common – they are Quick Steps and Custom Actions. I will go with Quick Steps first which provides a more tailored user experience for this goal and then explain Custom Actions briefly.
If you are already used to Custom Actions or Quick Steps to start SharePoint 2010 workflow, then you can just try to create one to start a SharePoint 2013 workflow. Since the UX is, basically, the same, it should be easy for users who have done this before.

Quick Steps

I will explain in detail how you can create a Quick Step to start a SharePoint 2013 workflow.

Preparation

Creating a Quick Step requires some prerequisites.
First, you need to prepare a Ribbon icon file to show up in the Ribbon for the Quick Step you will define in the following steps. I decided to use the Site Assets document library and uploaded an image file there.


Second, you must have a list or document library you want to create the Quick Step in. In this example, I will use a Vacation Request list and create a quick step which starts a workflow to request an approval for the vacation.


Create a Quick Step
Now that you have the list to use, it is time to create a Quick Step. It is very easy. Just click the New Quick Step button under Customize List group in LIST Ribbon tab as highlighted below.


If you used a document library, you can find it under Customize Library group in the LIBRARY Ribbon tab as below.


 Clicking the button will lead you to this dialog where you just need to choose Allow.


SPD is then launched with the Vacation Request list shown with the following dialog popped up.


Take some time to explore the UIs on this dialog. You will find that you can create a new workflow based on SharePoint 2013 Workflow or SharePoint 2010 Workflow, or use some existing workflows. You will also notice that you can define the button label and button image. As we will create a new workflow based on SharePoint 2013 Workflow, choose the Start a new workflow option and then choose SharePoint 2013 Workflow as the Platform Type. Type in ‘Vacation Approval’ for the Button Label field. Lastly, click the Browse button to locate the icon image we uploaded in the Preparation section. Your dialog should look like below:


Once you click OK, a workflow designer for SharePoint 2013 Workflow will be presented as below. Feel free to complete the workflow logic. In this example, as mentioned before, we will create a Vacation Approval workflow.


Once you publish your workflow, you’ve finished creating a new Quick Step. If you go to the ITEMS Ribbon tab, you will find a new Ribbon group Quick Steps is created and a new Ribbon menu Vacation Approval is created as well.


And if you go to the list summary page for the Vacation Request list in SPD, you will find that a workflow named ‘Button – Vacation Approval’ is present and a Custom Action named ‘Vacation Approval’ is created. As a matter of fact, Quick Step is a specific kind of Custom Actions. So if you are familiar with the Custom Actions’ features, you can apply them to your Quick Steps as well.


Modify Quick Step (Advanced)
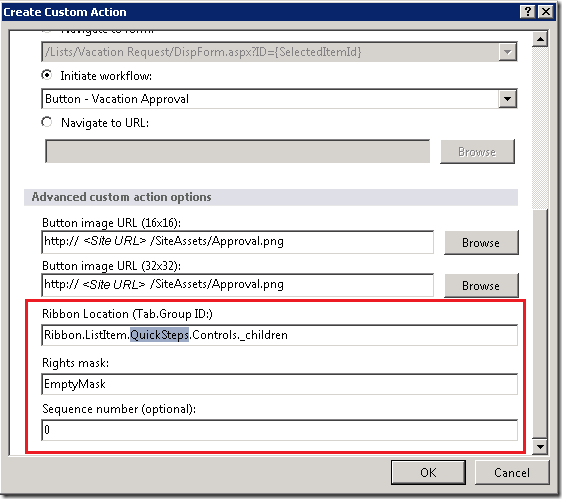
As Quick Step is a mixture of Custom Action (‘View Ribbon’ type Custom Actions) and a list workflow, you can apply some Custom Action features to modify the created Quick Step. If you click ‘Vacation Approval’ in the Custom Actions slab, the following dialog will be presented.

You can change the name of the button and even update the Quick Step to do a different job such as navigation to some forms or web pages, or starting a different workflow.


And if you scroll down a bit, you can find some advanced settings. If you use the Ribbon Location field and Sequence number field, you can change the location of the Ribbon button.


Let’s say, we want the button to show up in Workflows group rather than in Quick Steps group and want it to show up last in the group. Then you can easily achieve this by modifying the values to followings: 


This will make the button show on the targeted location as below.


If you want to know more about the values available in the Ribbon Location, please refer to following article or search for some other blog articles explaining Custom Actions.


For Rights mask, you can use the values from the below site separated by semicolons to allow only permitted user to see/use the Custom Action.


Custom Actions
Let’s say now, that after you have a new Ribbon menu to start the Vacation Request workflow, you want a similar menu on the List Item Menu so that users can start a workflow by right-clicking over an item, like below:


To do this, you need to create a new Custom Action of type List Item Menu. You can find the Custom Action Ribbon button in the list summary page for the Vacation Request list in SPD. If you click it, you will be presented with the following options. In this example, please choose List Item Menu.


In the dialog that follows, please choose Initiate workflow option and select the ‘Button – Vacation Approval’ workflow which was created during the creation of Quick Step so that two UIs will start the same workflow. And Click OK.


That’s it. You created the menu. If you go to the Vacation Request list, choose one item, and see the list item menu, you can find it.